 Qiusheng Wu
cb80e6e5bb
* feat(map): draw the MapLibre map in other CRSs, incl. planetary grids

MapLibre GL JS 6.15 can draw a flat map in any CRS registered with
addProjection (maplibre/maplibre-gl-js#168), placing tiles on that CRS's
grid without reprojecting them. A WMS renders each tile in the CRS on
request, so a map can now be drawn natively in polar and
simple-cylindrical grids of Earth, the Moon, Mars and other bodies, with
NASA GIBS and USGS Astrogeology basemaps read directly instead of being
warped to Web Mercator.

- preferences.map.mapCrs: a preset id or "EPSG:<code>", picked under
  Settings -> Map -> Map coordinate reference system. 18 presets, each
  with a basemap verified against its WMS; picking one also sets the
  celestial body.
- The CRS is part of the style, so every source loads in its grid.
  GeoJSON is projected in MapLibre's workers by proj4 (its UMD build,
  sent with importScriptInWorkers). WMS and ArcGIS export layers ask
  for {bbox} in the CRS; XYZ, vector tile, MBTiles and Wayback layers,
  the globe and terrain are set aside.
- An EPSG CRS gets a tile grid fitted to where its scale stays within
  2.5x of its least distorted place.
- Switching frames the new area; opening a project keeps its view.
- Bump maplibre-gl to 6.15.0 and move the offline EPSG resolver into
  @geolibre/map (new ./epsg-proj4 subpath).

Refs #1128

* Address review feedback

- Keep the map from staying blank when its initial CRS is cleared or
  fails before resolving: track the deferred blank style and apply the
  basemap then, and drop the failed CRS request so the default
  projection is enforced again (Claude, CodeRabbit).
- Key the Web Mercator bounds and transform constraint on the CRS
  actually applied, re-installing them when the CRS changes, so a CRS
  still resolving or one that failed keeps the default map constrained
  (CodeRabbit).
- Set the celestial body to Earth when a custom EPSG code is applied,
  since the EPSG tables describe Earth CRSs (CodeRabbit).

* Address Claude review feedback

- Resolve an EPSG code a preset uses (3413, 3031, 4326) to that preset.
  MapLibre registers one grid per code, so a derived grid for the bare
  code would have clashed with the preset's fixed grid, depending on
  which the session registered first.

* Fix map CRS test for preset EPSG codes

- A bare EPSG:3031 now resolves to its preset, so the plain-code case uses EPSG:3995, which no preset uses.

* Address Claude review feedback

- Evict a rejected CRS resolution and a failed worker-script load from
  their caches, so a transient lazy-chunk failure can be retried.
- Write the custom EPSG code (and the Earth body) to the Settings draft
  only when it differs from the saved one, so opening Settings on a
  saved EPSG CRS no longer resets the body or dirties the draft.
- Key the view latitude clamp on the CRS actually applied, like the
  bounds and transform constraint.
- Remember a CRS that could not be drawn and skip re-resolving it (and
  re-warning) until the preference changes.

* Address Claude review feedback

- Set the celestial body to Earth only when entering a custom EPSG CRS
  from a preset or the default map; editing one EPSG code into another
  keeps the body the user has since chosen.
- Attach the worker-script cache eviction once, where the promise is
  created, and only clear the slot if it still holds that promise.

* Address review feedback

- Move the per-map CRS state and the tile-template adaptation that layer
  sync uses into active-map-crs.ts, so layer sync (and the published
  headless bundle) never imports map-crs.ts and its Vite-only `?raw`
  proj4 import. Verified the tsdown build has no `?raw` import.
- Give planetary presets a WMS label servers read (EPSG:4326 for simple
  cylindrical grids, USGS's EPSG:32661/32761 for the polar ones) and
  ask user WMS/ArcGIS layers for it instead of the IAU code.
- Show the preset in the picker when a typed EPSG code resolves to one
  (3413, 3031, 4326).
- Move the body to Earth only on the first code written after the user
  picks "Custom EPSG code…"; later edits keep the chosen body.
16 KiB
Settings & Preferences
The Settings menu holds the workspace preferences: how the map behaves, which panels are visible, the interface language and appearance, geocoding and AI providers, runtime environment variables, and the entry point to Manage Plugins.
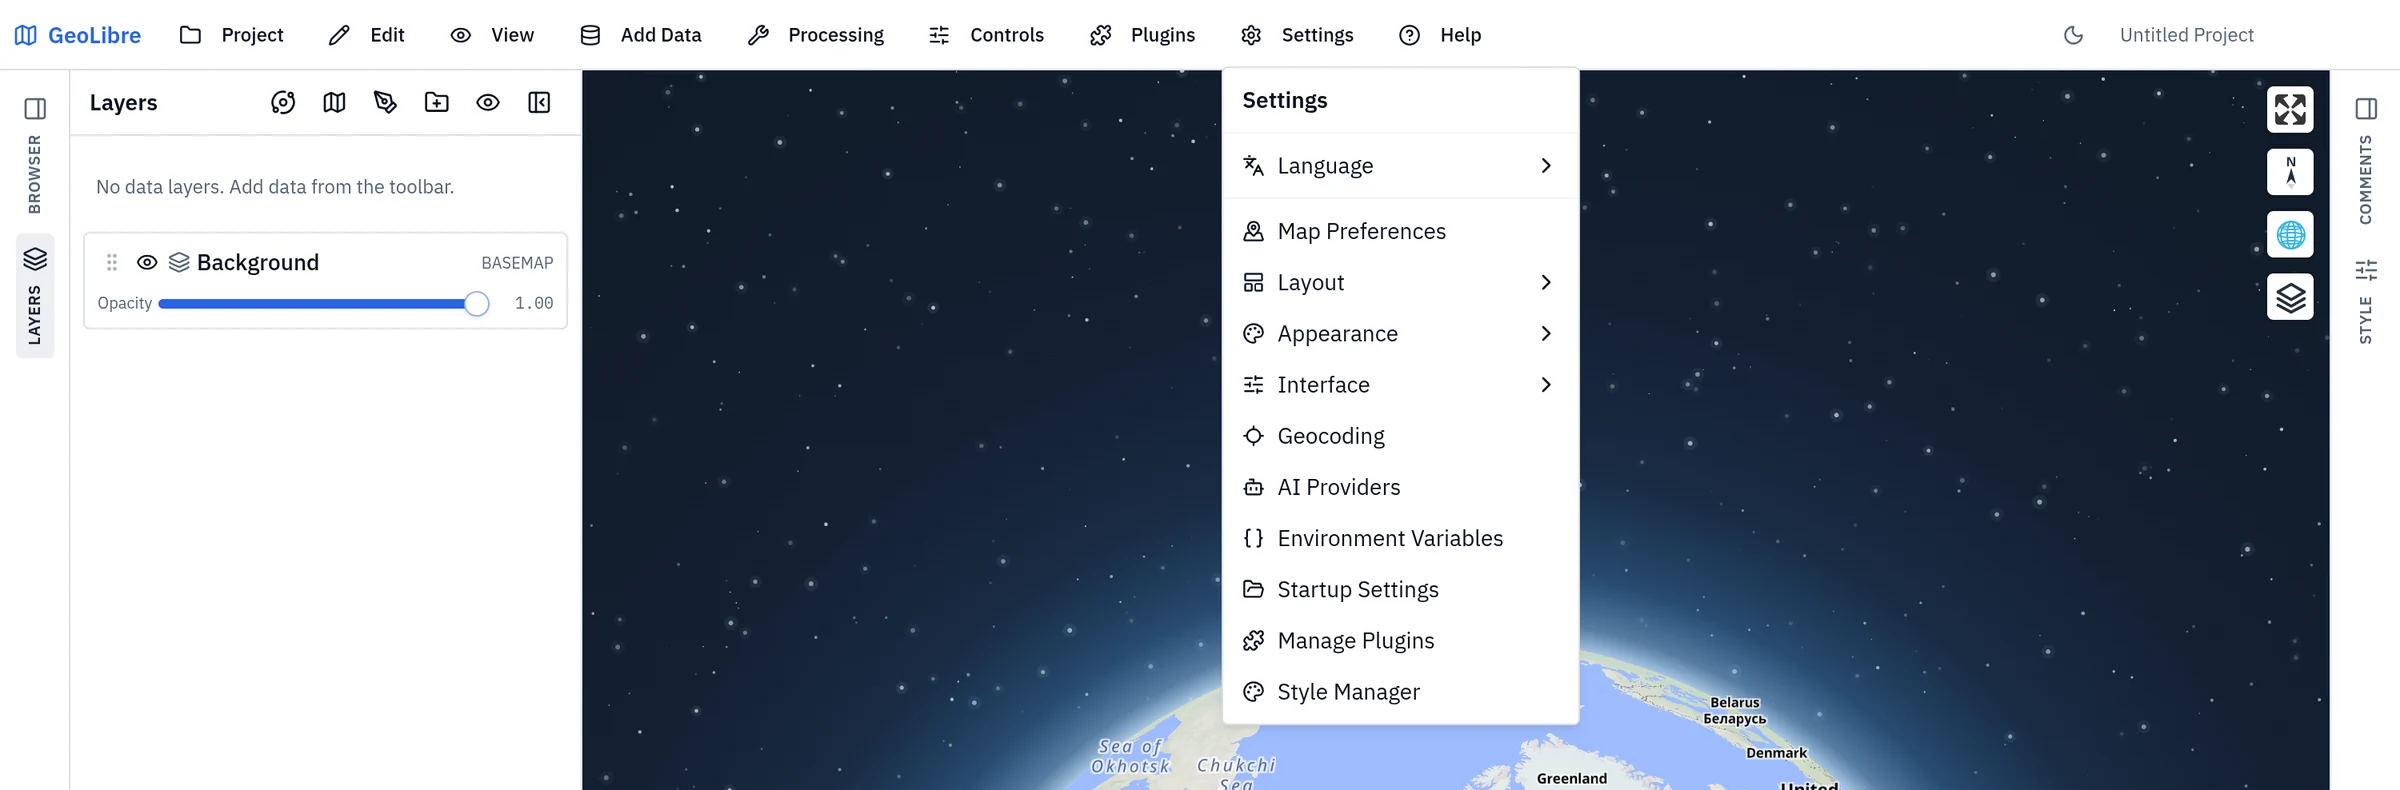
The Settings dialog is organized into these sections:
| Section | What it covers |
|---|---|
| Language | The interface language and optional Whitebox language packs. See Language. |
| Map | Navigation constraints, celestial body, scale units, and coordinate format. See Map Preferences. |
| Layout | Which panels and toolbar labels are shown. See Layout. |
| Appearance | Light or dark mode and the accent color applied on top of it. See Appearance. |
| Interface | The UI profile — an experience level (Beginner, Intermediate, Advanced, or Custom) that simplifies the menus, data sources, and plugins on offer. Nothing is removed permanently; you can switch levels at any time. See Interface. |
| Geocoding | The address-search provider. See Geocoding. |
| AI Providers | Model and credentials for the AI Assistant. See AI Providers. |
| Environment | The share token and runtime key-value pairs. See Environment Variables. |
| Cloud Storage | S3 connections for private buckets, and the S3 Browser's default location. See Cloud Storage. |
| Updates | Update checks (desktop only). See Updates. |
| Startup | The untitled workspace's projection and view, and (desktop only) which project the app opens with. See Startup. |
| Style Manager | Your saved symbology presets, reachable here and from a layer's Layer actions → Styles → Saved styles. See Styling Layers. |
Language
Settings → Language sets the Interface language. Each option is shown in its own script, with the English name alongside. Right-to-left languages mirror the whole layout. See Internationalization for the supported languages.
The same section manages optional Whitebox language packs, which translate Whitebox tool names, parameters, and help text without making every installation larger. Choose Download pack to fetch the official pack for the selected language, or Import file to install a pack file. Remove pack returns the Whitebox metadata to English. Packs are stored only on the current device. Downloading one sends the locale code, but no project data, to the pack host. Builds that disable downloads offer only Import file.
Map Preferences
Settings → Map Preferences controls how the map can be navigated:
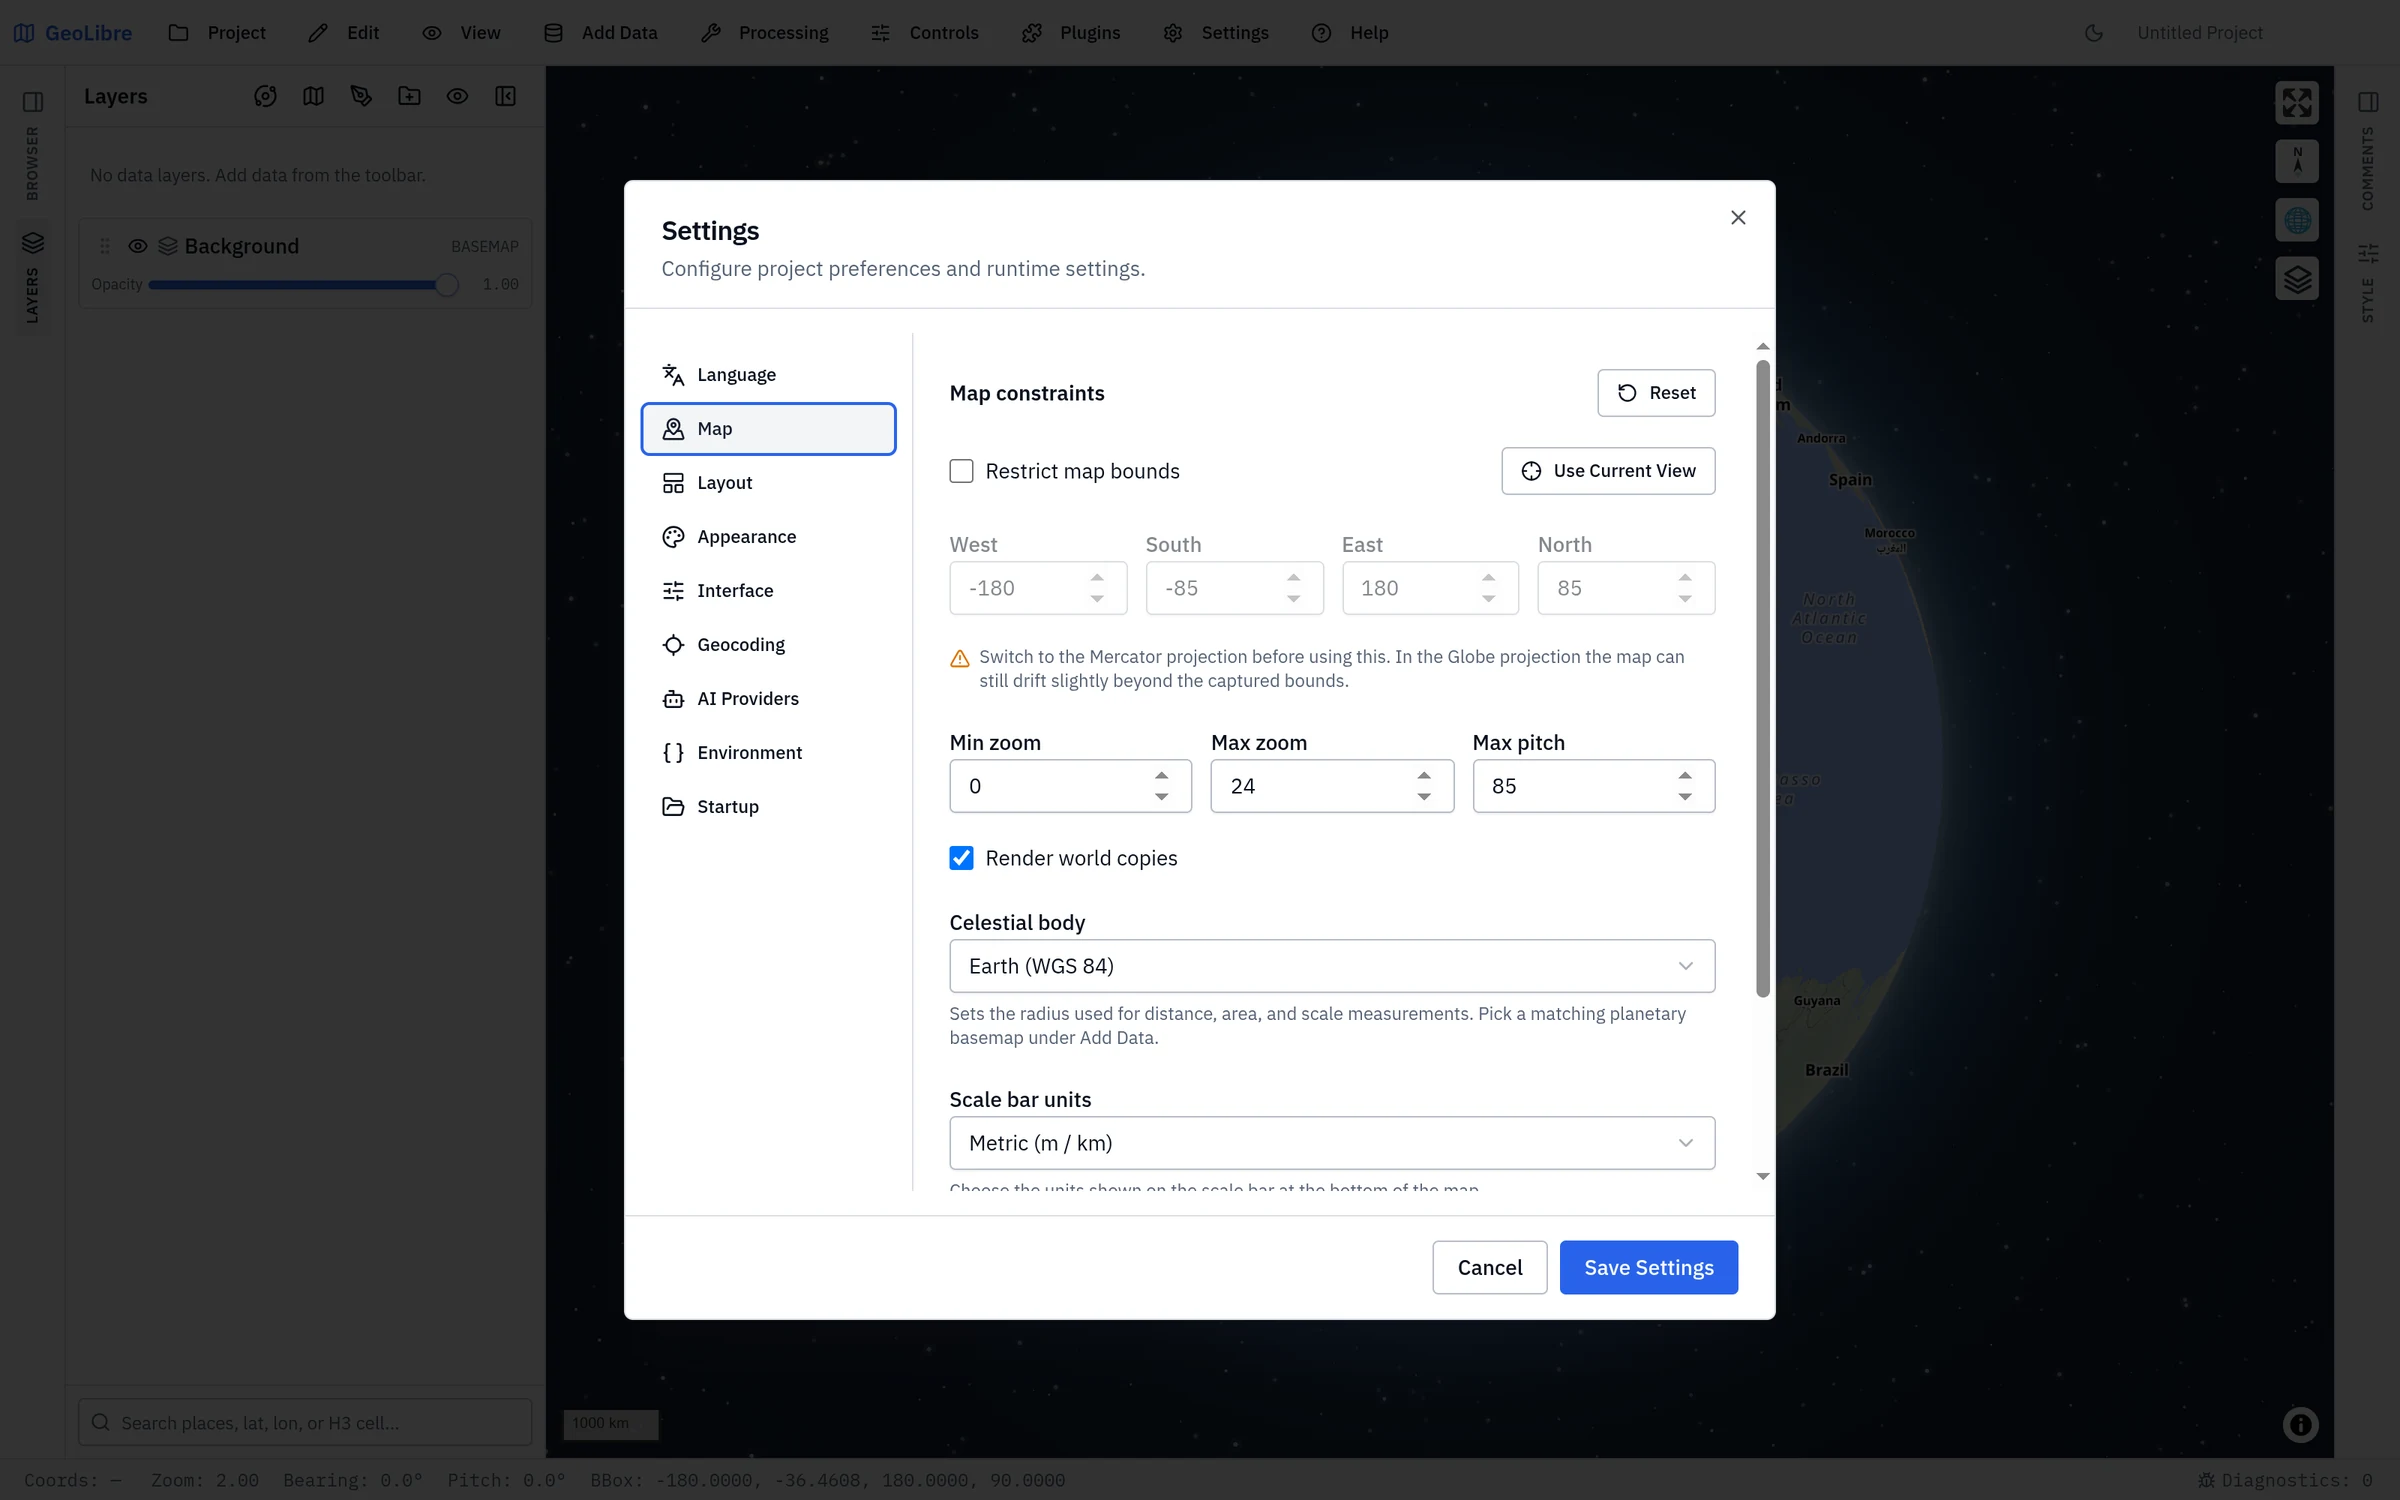
| Setting | Description |
|---|---|
| Restrict map bounds | Limit panning to a bounding box. |
| Bounds | The west, south, east, and north limits of that box. |
| Min zoom / Max zoom | The allowed zoom range (0 to 24). |
| Max pitch | The maximum tilt angle (0 to 85 degrees). |
| Render world copies | Show repeated copies of the world when zoomed out. |
| Celestial body | The body whose radius drives distance, area, and scale measurements. Pick the one matching your planetary basemap under Add Data. |
| Map coordinate reference system | Draws the MapLibre map flat in another CRS: Earth's Arctic or Antarctic polar stereographic or Plate Carrée grid, the Moon's and Mars' polar and simple-cylindrical grids, a simple-cylindrical grid of Mercury, Venus, the Galilean moons, Titan, Pluto or Charon, or Custom EPSG code…. Each preset brings a basemap served in that grid (NASA GIBS, USGS Astrogeology). See the MapLibre renderer. |
| Scale bar units | Metric (m / km), Imperial (ft / mi), or Nautical (nmi). This also sets the units used by the status bar's Elev and Eye alt readouts and by the quick-analysis buffer presets. |
| Coordinate format | The notation the status bar reports the pointer coordinate in: decimal degrees, DMS, DDM, UTM, MGRS, USNG, or x/y in a projected CRS. Choosing the projected format shows an EPSG field for the CRS code. See the status bar. |
Use Use Current View to set the bounds from where the map is now, or Reset to restore the defaults. These preferences are saved in the project file.
!!! tip "Capturing bounds on the globe" Use Current View is most accurate in the Mercator projection. In the Globe projection the map can still drift slightly beyond the captured bounds, and the dialog says so.
Layout
Settings → Layout Settings toggles the chrome around the map:
- Show toolbar labels: text labels next to toolbar buttons, or icon-only.
- Show project info: the project name and path in the toolbar.
- Show Layers panel, Show Style panel, Show Browser panel, Show Comments panel: per-panel visibility.
Panels also auto-hide on small screens for a responsive layout.
Appearance
Settings → Appearance picks the Mode (Light or Dark) and an Accent color applied on top of it: Blue, Violet, Emerald, Rose, Amber, or Custom, which takes any color from a picker or a hex code.
Interface
Settings → Interface chooses an Experience level that simplifies the interface: Beginner, Intermediate, and Advanced apply a curated layout at once. Below the levels you can switch individual Data sources, Plugins, and Menus on or off. Editing any of them switches the level to Custom. Nothing is removed permanently, and Reset restores the defaults. When an administrator manages the profile, this section is read-only. See UI Profiles.
Interface file copies a setup to other machines or a team. Export... writes the language, panel layout, accent theme, and interface profile to a JSON file. Import... applies such a file at once, and Import from URL loads one from an http(s) address (the server must allow cross-origin requests). Only the settings a file contains change, so a file that sets just the profile leaves the layout and theme alone. A file never carries credentials, plugin sources, or local paths, and never locks the profile. An exported file also works as the target of a settingsUrl= link, which applies it for one page without replacing saved settings.
Geocoding
Settings → Geocoding chooses the Provider used by Geocode Addresses, address import, and Reverse Geocode. Nominatim is the default and needs no key. For providers that need one, enter an API key. You can also override the Forward endpoint and Reverse endpoint, for example to point at a self-hosted instance, and give Nominatim a Contact email. The section notes where keys are stored: in the system keychain when it is available, otherwise in the project file. Keys are sent as query parameters, so they appear in request URLs. See Data Integrations → Geocoding for the provider list. With ArcGIS GeocodeServer (organization) the endpoint fields give way to a list of named Locators, each with its service URL, an optional portal for secured services, and a Check service button; see Organization locators.
AI Providers
Settings → AI Providers configures the credentials for the AI Assistant. Each configuration is a named profile, such as Work Gemini or Local Ollama. Choose Add profile, pick a provider, fill in the fields it asks for, then Save profile. Mark one profile Set as default to use it when the assistant opens; one configured profile is enough to start chatting. Credentials are saved on the current device, never in the project file. When a system keychain is available, the secret fields go there. On the desktop app, a blank key field falls back to the matching operating-system environment variable. See AI Assistant → Setup.
Environment Variables
Settings → Environment Variables (the Environment tab in the Settings dialog) holds the share account connection and the runtime key-value pairs that GeoLibre and its plugins read, such as API keys:
- Share.GeoLibre account: sign in to
share.geolibre.app(a popup on the web, your system browser on the desktop app), or sign out. Used by Project → Share and the Project Gallery. See Projects. - Share.GeoLibre API token: a personal API token for Project → Share, the fallback when sign-in is not available (for example on mobile or in a notebook embed). See Projects.
- Environment variables: named key-value pairs (for example, API keys for Earth Engine, Street View, and other integrations). You can enable or disable individual variables, and secret values are masked. Variable names must start with a letter or underscore and contain only letters, numbers, and underscores.
!!! tip "Where credentials go" Provider credentials for integrations like Earth Engine, Street View, Google Photorealistic 3D Tiles, or other keyed services belong here. See Data Integrations and Getting Started.
!!! tip "Reading AI keys from your system environment (desktop)"
On the desktop app, the AI Assistant also reads its own allowlisted keys (OPENAI_API_KEY, ANTHROPIC_API_KEY, GEMINI_API_KEY, and the other provider variables) straight from your operating system's environment variables — so you can keep API keys out of the saved project file entirely. A value entered here always takes precedence over the OS environment. See AI Assistant → Reading keys from your system environment for the full list.
!!! tip "Protomaps basemaps"
To use the Protomaps basemaps in the New project dialog, add an environment variable named VITE_PROTOMAPS_API_KEY with your own Protomaps API key. The Protomaps options appear in the dialog as soon as the key is enabled — no restart needed. When no key is set, the Protomaps section is hidden. See Getting Started for setting the key at build time for a self-hosted deployment.
Cloud Storage
Settings → Cloud Storage (also in the Settings menu) holds the S3 connections that read private Amazon S3 and S3-compatible buckets (access keys, AWS profiles including SSO, environment variables, and IAM roles), and the S3 Browser's default location. See Cloud Storage.
Project name and file
The project name is edited in place on the right of the toolbar, and it is saved into the .geolibre.json file. To also see the file path the project was opened from or last saved to, turn on Show project info under Layout. See Projects for the rest of the project lifecycle and Project Format for what the file contains.
Startup
Settings → Startup Settings chooses how GeoLibre opens a new session. The installed desktop app also offers project restoration modes:
| Mode | Behavior |
|---|---|
| Open the default workspace (default) | Start with a new, untitled project. |
| Reopen the last project | Open the most recently used local project. |
| Open a specific project | Always open one chosen project. Use Choose Project to pick the file; the mode stays unavailable until you have. |
Enable 3D globe by default controls the projection of the new, untitled workspace shown when no project is provided. Turn it off to start that workspace in Mercator. Default map view sets the center longitude, center latitude, and zoom level for the same workspace. Choose Use Current View to copy the center and zoom from the map canvas. A restored project or project link always uses the projection and camera saved in that project instead.
Open the S3 Browser at startup shows the S3 Browser panel each time GeoLibre starts; it stays open when you open a project. Default layer styles takes a layer styles file (Project → Export → Export Layer Styles): each layer you add whose name matches a style in it is styled automatically, while layers in opened projects keep their saved styles. GeoLibre keeps a copy of the file, so choose it again after editing it.
Default layers takes a layers file (Project → Export → Export Layers, see Projects). Its layers are added to every new, untitled project: the one GeoLibre starts with and each Project → New. Opened projects, project links, and templates are not changed. The file only references data, by tile or service URL, remote file URL, or (on desktop) a local file path, so each new project shows the data's current contents; GeoJSON loaded from a URL is fetched again, and a local file that no longer exists is dropped with a notice. Like the styles file, GeoLibre keeps a copy, so choose it again after editing it.
If the startup project has been moved or deleted, GeoLibre opens the default workspace instead, says so in a banner, and drops the missing file from the recent-projects list.
!!! note "Project restoration is desktop only" The browser build includes the empty-workspace projection option, but has no persistent local file to reopen, so the three project modes appear only in the installed desktop app.
Two deliberate limits are worth knowing:
- Only local projects are reopened. Opening a share link records it in your recent projects by its
https://URL, so Reopen the last project skips remote entries rather than fetching a third-party host on every launch. - A URL always wins. Launching with a project or
?data=parameter in the URL skips the startup restore entirely, and so does opening your own project before the restore finishes.
!!! note "Android reopens its own copy" Android identifies a project picked from device storage by a temporary reference that stops working once the app's process ends — which is exactly when the startup restore runs. So on Android GeoLibre keeps a copy of the startup project in its own private storage and reopens that copy, refreshing it every time you open or save the project. Two consequences worth knowing: a project edited in another app after you last saved it in GeoLibre reopens as GeoLibre last saw it (open it again from Project → Open From → File... to pick the newer contents back up), and a project deleted from the device still reopens from GeoLibre's copy rather than dropping out of the startup preference, because Android reports a deleted file and an expired reference the same way.
Saving a project you opened from device storage asks you where to save it, once — Android does not grant write access to a file you only picked to read. If your startup project is that project, the preference follows it to the file that save creates, so it keeps opening the copy you are actually working in.
Updates
Settings → Update Settings (desktop only) controls the update check: whether GeoLibre checks for a newer version at startup, and which kinds of releases raise a notification. Turn the check off for a fully offline workflow.
Style Manager
Settings → Style Manager opens your personal library of symbology presets. Save the style you have built on a layer, then apply it to any other layer in any project. The same library is reachable from a layer's Layer actions → Styles → Saved styles (Style Manager)…. See Styling Layers.
Manage Plugins
Settings → Manage Plugins opens the plugin marketplace. See Plugins & Marketplace.